Showing posts with label DIY. Show all posts

Wednesday, September 18, 2013

Making Shrunken Heads for Halloween


Oh yes. It is almost that time again! So as we plan our fun, I am reminded of years past when my Mom used to always give us a little treat bag for Halloween.

We lived in a small neighborhood, so the candy pickin's were quite slim. There was always one or two neighbors that give us the bulk of our candy haul, but many of the houses were quite dark on Hallow's Eve.

Last year we had a fun Halloween party and I did a post about what I wanted to make for the party and decor. Did you go check that link out?  ^the one up there^   It has some other good ideas for treats and tricks!

So here's how our Shrunken Heads went:

You will need:
  • As many apples as you feel inspired to fiddle with (any kind will do- I went with cheap, here)
  • Something to cut on/in/with (I sat on the couch watching a movie while the Hubs worked, with a bread pan in my lap. It worked fine.)
  • A bowl full of water with a splash of lemon juice (it will prevent the apples from turning, and helps with the drying process)
  • An oven set to low
  • A little bit of creativity
Start with apples...do I really need to show a picture of an apple? Didn't think so. I went ahead and peeled them-no fancy tools needed. Just use small knives (or cheese knives like I did!) And then look at them for a bit of inspiration. After peeling- I just gouged a couple holes for eyes, cut away a nose and gave each one a different mouth. I even attempted a kitty head. Cute, huh? 


Step 1: Peel the apples. Doesn't matter what kind. I just bought the cheapest there. Bigger apples make bigger heads, and different kinds make different color heads in the end. For the first one we just used the same kind of apples.

Step 2: Soak the peeled apples in water with a little bit of lemon juice. A tablespoon or two will suffice. 

Step 3: After soaking the apples a bit-the lemon juice method helps to keep them from browning and getting mushy- carve them into faces.Tip No. 1:  Be sure to over exaggerate the features. Remember these guys are going to shrink! A LOT! 


As you can see- they don't need too much detail... and if you are wondering where the scraps are- well. It was apple, after all. I ate every last piece that I carved away. ^_^

Step 4: Turn your oven on to no higher than 175 F. Put the apples on a wire rack, and stick them in the oven. After about ten minutes turn the oven off and let the apples sit over night.


These are the wonderful things I woke up to! Aren't they awesome!?

If they haven't fully dried out, just put them back in the oven, crank it to 175 F and then shut it off. And repeat that until they are dried to your heart's content.


Then: skewer, and poke into a burlap sack filled with beans. Or find another way to display your creations! Either way, have fun and show me what you made! I'd love to see your ghoulish friends!!!


~Live in the sweet rhythm of love!


Friday, October 19, 2012

Affordable Halloween and Fall Decor

So we all want to have ghosts and ghoulies and all things spooky this time of year. Frankly, decor isn't really in our regular budget. Once in a while, when I find something practical, useful and affordable we add it to our  Little House of Love. But switching out decor for every season, isn't quite something we've chosen to spend our money on, so I have to get creative. Utilizing nature and sales and craftyness when at all possible. So here's what is on my list of things to do for the Fall/Halloween season!


Oh yeah. I'm excited about this one! We are having to make a couple modifications, but I think it will turn out great! If you wanna see the details here's the site! I'm not too sure on the lighting aspect of the whole thing, but we'll see. And I will do my best to get some detailed pics up after the weekend! But we're planning to use an old pickle jar, the four dollar head and about 2 dollars worth of hair gel. And if we had gone to Dollar General I'm sure we could have gotten the hair gel for much cheaper. Not sure tho. I don't use gel.


These lil' creepos are in the oven as I type. Oh my goodness it was so much fun! And the fact that you can eat what you scrape away made it that much more enjoyable. A great activity to do while listening to some spooky music with the kiddos! Easier than carving pumpkins, and a good way to get them into the decorating aspect of it all. We bought the cheapest apples and all we had to do was carve them and soak them in some salted lemon water. Super duper easy, and super duper cheap! Also I have a little trick I'll share when I do the tutorial...it lets you eat more of the apple, and well. I think it will help with the display aspect of the project. The great tutorial I used is here.

Okie dokie, so those were the kind of easy schmeezy ones, right. Well....the other ones I'm planning on doing are too! I know...get on with it, right? Okay.

So we're planning on doing a little party for the spookies. Really, we just want to hang out with our friends and enjoy some time together. So yeah... I want some decorations to make the house a little more festive. I have tons of construction paper laying around the house, so I'll be utilizing some of the huge stack to make this guys:
.

Aren't the precious!?!? They come from a sweet little blog that I've gotten some great advice for organizing from: Organize Your Stuff Now She has a no-nonsene, budget friendly way of organizing and decorating that I love. Maybe I should join one of her link parties. ^_^  She used scrapbooking paper, but I will use construction paper...because I have the motherload from my education classes. >.<

What else...goodness if I had the time I'd be doing all the stuff I pinned to my new spooky board. So fun!

Oh yeah, I almost forgot these guys. I still have to find some glow-in-the-dark paint...


I think they will be cute lining our walkway to the house! Hello Lucky provided this idea! Again, I'll be changing a few things up in hopes that they will be something we can use next year too!

And to revisit a couple things I've done in the past....

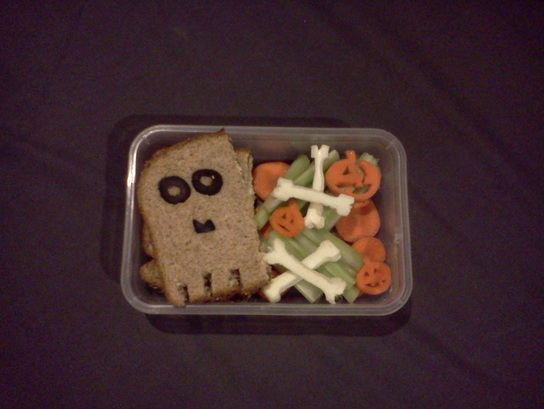
This was a lunch for Shi, and it had bones, ribs, and pumpkins made from carrots! He loved it!
I think I'll have to make him one or two to assemble this year. 
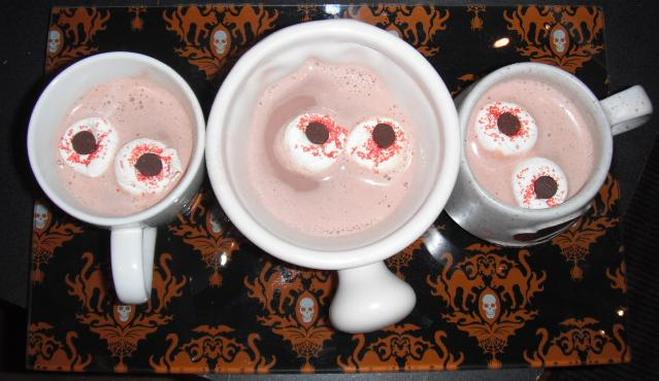
How could I forget these!?! They were so fun! And simple with things we have at the house. Always!

Let me know what gets your spooky bone crafting! I will have plenty to show next week! Time to go check on my shrunken heads!

~Rolling through life to the rhythm of love...share the bliss!


Sunday, July 22, 2012

Pinteresting Toothpaste

For quite some time now, I have been itching to make household cleaning and hygienic supplies. I have seen so many blogs and posts on Pinterest about making everything from deodorant to cleansing wipes. And even toothpaste. 


We have been buing toothpaste at Cost-Co, it was more affordable than buying the regular stuff at HEB, or our favorite local health food store. And I avoid WallyWorld like the plague....don't get me started....but I was sad when Cost-co stopped carrying fluoride-free toothpaste. I gave in to the economy of the price tag, and we were brushing with the fluoride laden stuff for a while when I noticed my teeth were getting spots on them. Eww! I won't post a picture of my teeth, but this is the idea: 


This stage isn't supposed to be "dangerous"
After over 20 years cavity free, and always being given compliments on my pearly whites, I was in shock! I decided to do some research and found out that it was probably from dental fluorosis. Which is basically, from what I understand too much fluoride in your body. Some of the stuff I read was just plain scary, and some was just plain ridiculous. But from what I saw, and from what I know of my life changes...my darling husband and I decided to quit the fluoride.

I went to price the natural toothpaste at our health food store, and at 4-5 dollars a bottle, I thought "surely there is something better out there."

There is, and I found it! This Blog had the recipe I based mine off of. But I used a few others that seemed similar, and came up with the New Stone Zahne Potion Version 1.0. I mean, our first batch of Toothpaste. I say the first batch, because I will be tweaking and trying different flavors until we can find something each of us like. I already know I would like to make an herbal toothpaste, and our lil guy would probably appreciate something with a sweeter undertone.

Easy recipe. I made it at 1am, after a dinner and a movie with the hubs and we are loving it! My teeth are so happy, and fresh feeling, and I know it is better for us, and more affordable so that makes the 10 minutes spent mixing well worth it. Of course the hours I spent researching a good recipe, well...those are hours well spent on our health, and hopefully hours saved for you, wonderful reader!

So without further adieu, I present to you, my recipe. Sorry, for the lack of pictures, it was super late, and last minute...
  • 2/3 cup baking soda (I used to just rinse with hydrogen peroxide, and brush with baking soda, but this will freshen your breath much better)
  • 1/3 cup coconut oil (or more depending on consistency you desire)
  • 2 Tablespoons raw honey
  • 1-2 teaspoons peppermint essential oil for flavor (more or less to taste)
  • 1 teaspoon sea salt (I use Pink Himalayan)
  • water (added for a more desirable consistency)

    Step 1: If you prefer, warm the honey and Coconut oil so it is easier to work with, I did not, since they were both liquids at room temperature
    Step 2: Whisk all ingredients minus the water together until thoroughly combined
    Step 3: Add more flavor, honey, or coconut oil to your preferred texture, using water if you so desire. I like a more crumbly texture/paste, so just a tablespoon of water was enough, but for our lil guy's I made it with about 3 tablespoons of water, so it's more like the stuff he is used to.
    Step 4: Put in a container, give it a go, and never spend too much on Toothpaste again!
  • Oh and don't forget step 5: Send me your pictures of those pearly whites, and those cute little ones helping make this super easy recipe, as well as any comments or questions you may have. 
If you let your kids help, you can measure out the "magical fairy's" ingredients
 and let them have fun with creating a healthy alternative to what's for sale 

Our finished product, I like it more powdery,
 but you can make it more like a paste
It looks crumbly, but once you wet your toothbrush...

...just dip it in, and voila!  
Such a brilliant idea...can't believe we have been spending so much on toothpaste all these years! All of the ingredients ended up costing less than a tube of the all natural stuff, and we have about two tubes worth of toothpaste!

If you'd like to see the health benefits, or the cost breakdown just let me know. I'm happy to share!

As always, thanks for reading! Happy Brushing!


Related Posts Plugin for WordPress, Blogger...