Saturday, January 5, 2013

Sunday Funday Catchup


Happy New Year, and welcome to the new and improved Mrs. Stone....

Wait. Scratch that. Happy New Year, yes. New and improved...well, no. 

Shall I explain? Oh there I go with asking myself questions again...

While everyone else is busy making resolutions and deciding to change this or that, I've decided to keep on keeping on. This past year has been wonderful. Full of love and surprises, overflowing with work and joy...so why would I want to change a thing!? 

I feel that me and the Mister are still in our Honeymoon phase~having a bonus-son in a new marriage can make us forget sometimes that we are still a fairly new couple, but it makes us remind ourselves to take some time out for us. So today will be a day devoted to being that "newlywed" couple. 

You know, the ones itching to make an addition to the family? The couple knowing that something great can come from their love...so we are going to see about adding a little extra joy into our life.

We are meeting a puppy today. It might, or might not work out with the dog...but we are going to see! 

So here is a bit of what we've been up to, and more to come!


We made our first Gingerbread house...I did the design and cookie forms. Such fun!


At Nene and Papa's we had some fort building fun


My sweet hubs made an ornament for us from our first tree... swoon.


The Final Christmas Lights Drive...


And the New Years Rose Parade with Jon Darling.

Life is good.

See you Monday with some of my musings!


~Rolling through life to the rhythm of love...share the bliss!


Saturday, December 22, 2012

Wait, what? Christmas is Tuesday?

Oh yeah. It is almost here! I have been a bad blogger...but I have been taking pictures of everything I've been working on! Promise!

I am so busy with some possibly life changing things...that I can't divulge too much information on. One has to do with absorbing pretty much every second of my free time, and has been lots of fun. The other....well.

I promise after the new year I will share.

For now...I will share some instagram photos....and maybe a couple pins of my Christmas projects.
We did our first 5K It was so RAD! 
Our Elf, Star has been VERY busy!

Oooh, and look at this Blackberry Pie I made! Soooo yummy!


Hope this day finds you well in the mood for some holiday fun! Let me know what you've been up to!

~Share your bliss!
<3 Cassie

Saturday, November 24, 2012

A Post Thanksgiving Aloha Affair!

So first, I'd like to say Happy Thanksgiving to all! I know that living a happy life means being thankful for everything we are given in our lives daily, but it sure is nice to have a day to devote to sharing our thanks with those that help make it such a wonderful life, indeed.

Annnnnd, second, I'd like to say Aloha to everyone joining my lil Bloggie Thingie from the Aloha Affair Blog Hop. I am so green in all things dealing with blog sharing, but I am so happy to learn! I've found some great blogs to peruse and hope y'all like what I have to share as well!

So, in hopes of keeping this post short, and sharing the love here are a few highlights from our Week of Giving Thanks, and the Aloha Ladies.

**Update** It just dawned on me that some readers may not know what a Blog Hop is...okay, in a few words. You join up with other bloggers to share your hard work!

The way it works for this one, there are a few hosts that you really should follow because they have put a lot of work into making sure this thing run smoothly, and then you click on the link down there, after all the images of all the blogs to join that says "Click here to enter" enter your blog info and a cute thumbnail, and get the linky code, put in your HTML code...and there you have it!   **Update over, for now. If you have more questions, just ask! I don't bite too hard! <3

The weather was so irresistible, we had a delightful time eating outside! 
Not sure if I was going to pick his nose, or if I was saying I'm thankful for him. ^_^
Of course, I had to make Kettle Corn for our movie marathon!
Even a leak couldn't dampen our spirits! Khloe, that cute lil pooch, was so interested in the repairs!
~Rolling through life to the rhythm of love...share the bliss!


Thursday, November 1, 2012

Halloween Projects

I have to admit. This week has flown by! The 'lil guy just finished up a class at church so we're going to have quite a bit more free time now. Thank goodness!

I haven't finished all of the projects for Halloween-between meetings for the Hubs and helping a friend out with the kiddos.... well. I've got a lot to catch up on this weekend!


Project # 1

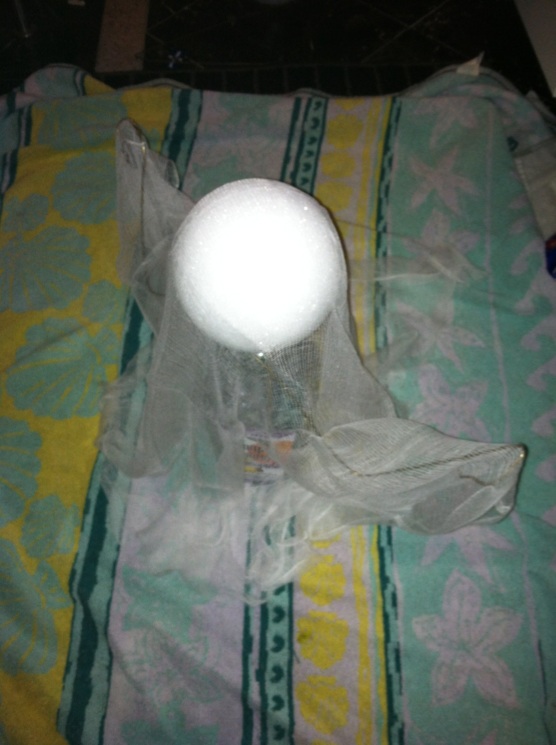
The Cheesy Ghost! I talked about doing this one in my last post. Or did I? No...I didn't! And this was one of the easiest ones for us to make with stuff we had around the house. Well. I did run out of Starch and had to get more. But it was super easy, and usually I would have everything on hand! Okay, so here's the site I found the tutorial on...she has some fun stuff over there!

Ok. so you need:

A Styrofoam ball (and I used a skewer to push in the ball so I didn't have to jam it onto the bottle)
A wire hanger you don't mind untwisting
A Juice Bottle, or something to prop up your Ghost
Cheesecloth-depending on size and height of ghost
Some felt to decorate the face (if you want)
An old towel
A hairdryer (if you're crunched for time) It helps speed the dry time, but can hurt your design a bit


Step 1: Disassemble the wire hanger and wrap it around the neck of your bottle. Bend the ends to form little "hands" so the cheesecloth doesn't get snagged, and bend the form into a sort of ghost like shape. Then using the skewer, attach head to bottle. (the instructions I read said to put the styrofoam onto the bottle, but I found that if you left the ball wrapped, or wrapped it in cellophane the cheesecloth was easier to remove so jab in the skewer and just let the 'head' rest on the bottle top. it works beautifully and you can reuse your ball for other things!) 


Step 2: Find a place to dry your ghost, lay out your towel, and then drape your cheesecloth over the form. I bought a large section of cheesecloth and trimmed it to fit over the form.

Step 3: Spray the cheesecloth thoroughly with starch, and let dry. I tried speeding up the process with a blowdryer, but it blew the arms and made the first figure look strange, I preferred just letting it dry over time. On top of the oven was best-while we were baking it kept it warm and dry.

Step 4: Add a face with felt or stickers or whatever if you want. I liked how it looked just with the cheese cloth, but later on we added a sticker face. Then display it and enjoy!


Project # 2

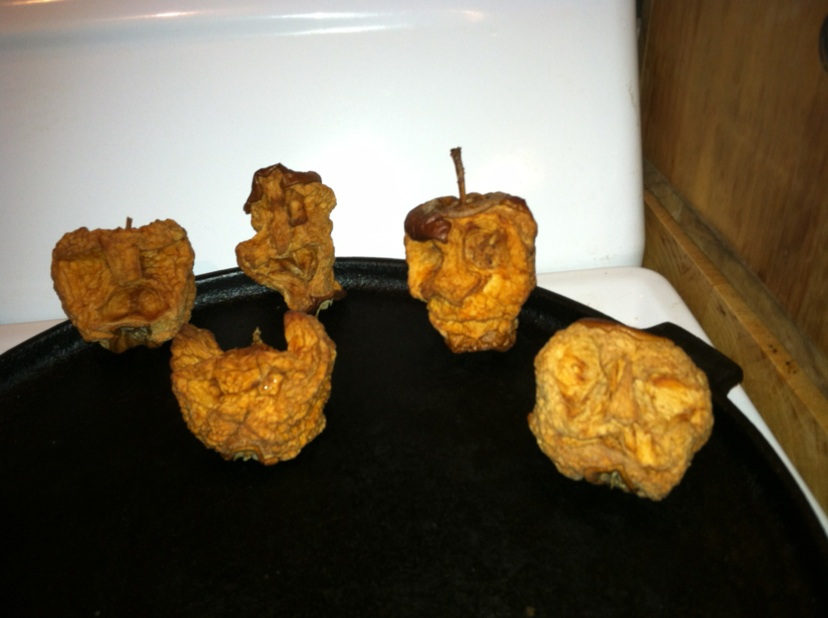
Shrunken Heads! These were soooo much fun! Look at that guy!

Isn't he just creepy!? I love the "hair" and this was something our lil guy helped with.


Even the Wolf could help!

Okay...so I found this one on Pinterest and it was before the secret boards came out, so I didn't mark the pin that I used. If you want it I can get it, but um, well.  Yeah, I doubt anyone asks for it!


All you need are apples, a cutting board, cutting tools, an oven some water and lemon juice!
Step 1: Peel the apples. Doesn't matter what kind. I just bought the cheapest there. Bigger apples make bigger heads, and different kinds make different color heads in the end. For the first one we just used the same kind of apples.

Step 2: After peeling apples soak them in water with a little bit of lemon juice. A tablespoon or two will suffice. 

Step 3: After soaking the apples a bit-the lemon juice method helps to keep them from  browning- carve them into faces.


As you can see- they don't need too much detail... and if you are wondering where the scraps are- well. It was apple, after all. I ate every last piece that I carved away. ^_^

Step 4: Turn your oven on to no higher than 175 F. Put the apples on a wire rack, and stick them in the oven. After about ten minutes turn the oven off and let the apples sit over night.


The next morning they should look something like this


Don't worry if they aren't completely dry. The process really depends on the moisture levels and slowly drying them out. If you need to put the oven up to 175 again for a little while and let them dry some more. Just make sure they are not squishy when you pack them up for next year! ~I actually will dry ours a bit more before packing in plastic baggies for the attic. I'm interested to see what they'll look like after ebing in the attic for a year! 


He was my favorite. I loved the tuft of hair on his face and his nose. So cool!
Oh, and a great way to add some life is by placing cloves for their eyes after they've dried and rice for the teeth...my hubby liked this look better than the rice and cloves...maybe next time!


Here's how I displayed the creepy shrunken heads. I made some Monster Munch for Halloween (careful, that stuff is addicting!) And I had a burlap sack from some pistachios we bought in New Mexico so I put some tissue in the bag, poked some toothpicks in the heads and arranged them in the sack. Easy schmeezy! 

Project # 3
Head in a jar! Oh this was super cool! It was a bit harder finding a head big enough for what we wanted and malleable enough to fit in the jar I had...but we did it! 

Creepy, huh? Super easy- You need a jar, a head and some hair gel. We bought the green gel from Target that was super cheap and a head from a Halloween store that was supposed to be put on your lawn. I stuffed it with some plastic bags, stapled it into a round shape and stuffed it in the jar. The directions said to spray paint the head, but we just sharpied over it. It worked!

Some other stuff was included in our Ghoulish festivities, and if I get some time I will post some of those recipes. But for now, I need to go pump out some words for my Nanowrimo book.

Thanks for reading, and let me know what you've been up to! I'd love to see some other bloggers and their projects!

Friday, October 19, 2012

Affordable Halloween and Fall Decor

So we all want to have ghosts and ghoulies and all things spooky this time of year. Frankly, decor isn't really in our regular budget. Once in a while, when I find something practical, useful and affordable we add it to our  Little House of Love. But switching out decor for every season, isn't quite something we've chosen to spend our money on, so I have to get creative. Utilizing nature and sales and craftyness when at all possible. So here's what is on my list of things to do for the Fall/Halloween season!


Oh yeah. I'm excited about this one! We are having to make a couple modifications, but I think it will turn out great! If you wanna see the details here's the site! I'm not too sure on the lighting aspect of the whole thing, but we'll see. And I will do my best to get some detailed pics up after the weekend! But we're planning to use an old pickle jar, the four dollar head and about 2 dollars worth of hair gel. And if we had gone to Dollar General I'm sure we could have gotten the hair gel for much cheaper. Not sure tho. I don't use gel.


These lil' creepos are in the oven as I type. Oh my goodness it was so much fun! And the fact that you can eat what you scrape away made it that much more enjoyable. A great activity to do while listening to some spooky music with the kiddos! Easier than carving pumpkins, and a good way to get them into the decorating aspect of it all. We bought the cheapest apples and all we had to do was carve them and soak them in some salted lemon water. Super duper easy, and super duper cheap! Also I have a little trick I'll share when I do the tutorial...it lets you eat more of the apple, and well. I think it will help with the display aspect of the project. The great tutorial I used is here.

Okie dokie, so those were the kind of easy schmeezy ones, right. Well....the other ones I'm planning on doing are too! I know...get on with it, right? Okay.

So we're planning on doing a little party for the spookies. Really, we just want to hang out with our friends and enjoy some time together. So yeah... I want some decorations to make the house a little more festive. I have tons of construction paper laying around the house, so I'll be utilizing some of the huge stack to make this guys:
.

Aren't the precious!?!? They come from a sweet little blog that I've gotten some great advice for organizing from: Organize Your Stuff Now She has a no-nonsene, budget friendly way of organizing and decorating that I love. Maybe I should join one of her link parties. ^_^  She used scrapbooking paper, but I will use construction paper...because I have the motherload from my education classes. >.<

What else...goodness if I had the time I'd be doing all the stuff I pinned to my new spooky board. So fun!

Oh yeah, I almost forgot these guys. I still have to find some glow-in-the-dark paint...


I think they will be cute lining our walkway to the house! Hello Lucky provided this idea! Again, I'll be changing a few things up in hopes that they will be something we can use next year too!

And to revisit a couple things I've done in the past....

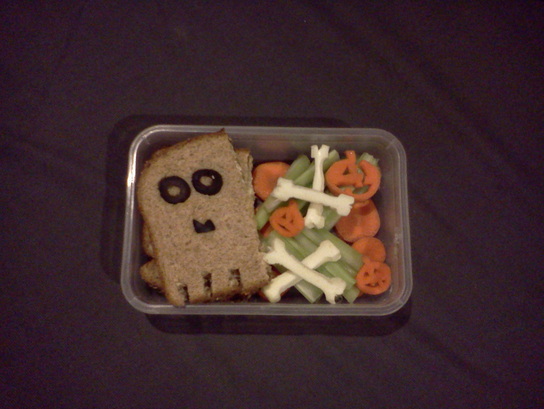
This was a lunch for Shi, and it had bones, ribs, and pumpkins made from carrots! He loved it!
I think I'll have to make him one or two to assemble this year. 
How could I forget these!?! They were so fun! And simple with things we have at the house. Always!

Let me know what gets your spooky bone crafting! I will have plenty to show next week! Time to go check on my shrunken heads!

~Rolling through life to the rhythm of love...share the bliss!


Thursday, October 18, 2012

Nostalgia on a Thursday Night

I was reading an article I found online about what to buy a person when they first get a new home. It was broken down into lists depending on culture and regions. I was intrigued at the simplicity of the list for the new German kitchen, and had most of the items on that list, whereas on the "American" list I didn't have even half of the list.

Of course, we aren't the typical U.S. or "American" family. One income, small house, no credit cards...living in our means...if you are familiar with my blog then you know. I try to make our pennies stretch and our dollar, well it gets around.

So...back to the list. For the American household the list was:

Cast iron skillet
Dutch oven
Charcoal grill
Heavy-Duty food processor
Kitchen cart w/built in butcher block
Sandwich press
Roasting pan
Deep Fryer
Knife Set

Now, I am no gourmet cook...but none of these things were in my kitchen when I first started out on my own. Not a one. I didn't get a Cast Iron Skillet until this summer, and we just bought a dutch oven a week ago. I have a measly two cup food processor that I rarely use, which screams like a banshee if I put more than two frozen bananas in it to make my Banana Ice Cream. I have some knives, only one really nice one up until my Birthday when I was gifted a couple more. We do have a grill, it is propane...I think of Hank from King of the Hill every time I think of grilling on propane.

I don't think I ever want a fryer in my home. I can fry things in my wok...and well, fried is not a word I want in our weekly food rotation. A roasting pan would be nice, but frankly I'm not sure I want to store something I would only use once in a blue moon...our space is so limited. Which brings me to the kitchen cart. Yeah...no room for that. But once we finish our porch I think I will get one so that it will be easier to take things outside. Do I really need to discuss the sandwich press?

Yeah... didn't think so.

So the list for Germany:

Einkaufskorb- a Shopping basket
Frühstückbrett- small breakfast board used for breakfast or snacks
Potato Masher/Ricer
Cheese & Fruit Knives
Coffee or Tea Pot
Salad Bowl
Beverage Tools
Cloth Napkins & Napkin Rings
Pots & Pans

I have everything on this list except the Breakfast boards and the Cloth Napkins and Rings...both of which I would love to have, just haven't found ones that I like yet.

Well...scratch that. I have found some Breakfast Boards that would be really awesome...

Haha, so true. Nothing beats coffee or breakfast brought to bed, tho.
(For my Non-German Speaking readers:
It means; If you want breakfast in bed, then sleep in the kitchen!)
I think this one is just pretty! Even though I'm not a surfer...
And this one...oh my. A bit harder to explain in English, but here goes.
The first part says "Men are easy..." but if you add the anders it changes the meaning to
"Men are just different"
Get it?
Got it.
Good.
Now I want to buy it! ^_^

So as I'm looking over the options on google, I see something that I didn't realize. A dear friend of mine actually sent me one, and I didn't even realize it! I have a Frühstückbrett! From Germany! That makes me so happy. And...another wedding gift might just work as one too. ^_^ We received a cute little cutting board with an engraving on it. Awh...soo scratch that too! I do have a couple. Now I just need to find some good, affordable napkins and napkin rings. Then I will have a proper German Küche (kitchen).

Daily I use the tea kettle, and my knives...I don't think I would regularly use a sandwich press or a dutch oven. That's more for restaurants and camping, respectively.

Of course this is coming from the woman who doesn't have, nor want a dishwasher. Our water is so hard it would spot everything and that would drive me crazay!

What are your necessities in the kitchen? If I left something out let me know. I'm always up for a new idea for making life simpler....I think an immersion blender or dough hooks for my hand blender would be fabulous!

Thanks for reading! I hope you'll share your ideas and blogs with me!
~Cassie


Wednesday, October 17, 2012

Bad Bad Blogger.


Oh I have been so bad! Where did September go!?

I was working on my posts with the Challenge...and BAM! Happy Birthday to me. Then the world got crazy busy, and well...I haven't blogged.

So I guess I can do a bit of an update....

First I will finish the questions. I will give the short version and not go too far into them because, well...the main reason I lost steam on it was the last questions weren't really that intriguing for me.

So here goes, and then I'll be back to my blogging self...

Day 26 : Have you ever thought about giving up on life? If so, when and why? No, I don't think giving up was ever an option.

Day 27 : What’s the best thing going for you right now? The best thing going for me? Well...life. I love my life, and all the people that make it better.

Day 28 : What if you were pregnant or got someone pregnant, what would you do?Day 29 : Something you hope to change about yourself. And why. Luckily I can't get others pregnant....um but if I was to become pregnant, well I think I'd worry about having space in our cozy little house of love. We don't exactly have the set-up for another kiddo!

Day 30 : A letter to yourself, tell yourself EVERYTHING you love about yourself Everything I love about myself? Um well, self...I think you are creative, and love the logic mind that overpowers all negative emotions. I love that you are a natural bullshit detector, even if that creates issues with those who like to spew B.S. like nobody's business. I love that you are real, and let people know what you think, because the only people that get upset about you telling the truth are those who live in lies. I love that you like to try new things, all the time-even if that means you get a little scared something might not work out. I also love that you are a teacher at heart and are always looking for ways to try and make others lives better. If only you could figure out how to reach those who don't think they want your help... I love that you are in a boot camp now, and whipping  your booty back into shape. Be sure to keep it up, and love that body more! ^_^ Keep on writing, even if you are the only one reading it and be sure to keep writing down those crazy awesome dreams of yours! 

That is all for now...recipes and other stuff coming soon! Yeah buddy!
How about a Montage Monday, Tell it like it is Tuesday, and a Foodie Friday? Or perhaps a Delicious Donnerstag? Well....I'll figure it all out soon enough!

For now, this lil stone is rolling to bed!


Related Posts Plugin for WordPress, Blogger...