
I haven't finished all of the projects for Halloween-between meetings for the Hubs and helping a friend out with the kiddos.... well. I've got a lot to catch up on this weekend!
Project # 1
The Cheesy Ghost! I talked about doing this one in my last post. Or did I? No...I didn't! And this was one of the easiest ones for us to make with stuff we had around the house. Well. I did run out of Starch and had to get more. But it was super easy, and usually I would have everything on hand! Okay, so here's the site I found the tutorial on...she has some fun stuff over there!
Ok. so you need:
A Styrofoam ball (and I used a skewer to push in the ball so I didn't have to jam it onto the bottle)
A wire hanger you don't mind untwisting
A Juice Bottle, or something to prop up your Ghost
Cheesecloth-depending on size and height of ghost
Some felt to decorate the face (if you want)
An old towel
A hairdryer (if you're crunched for time) It helps speed the dry time, but can hurt your design a bit

Step 1: Disassemble the wire hanger and wrap it around the neck of your bottle. Bend the ends to form little "hands" so the cheesecloth doesn't get snagged, and bend the form into a sort of ghost like shape. Then using the skewer, attach head to bottle. (the instructions I read said to put the styrofoam onto the bottle, but I found that if you left the ball wrapped, or wrapped it in cellophane the cheesecloth was easier to remove so jab in the skewer and just let the 'head' rest on the bottle top. it works beautifully and you can reuse your ball for other things!)
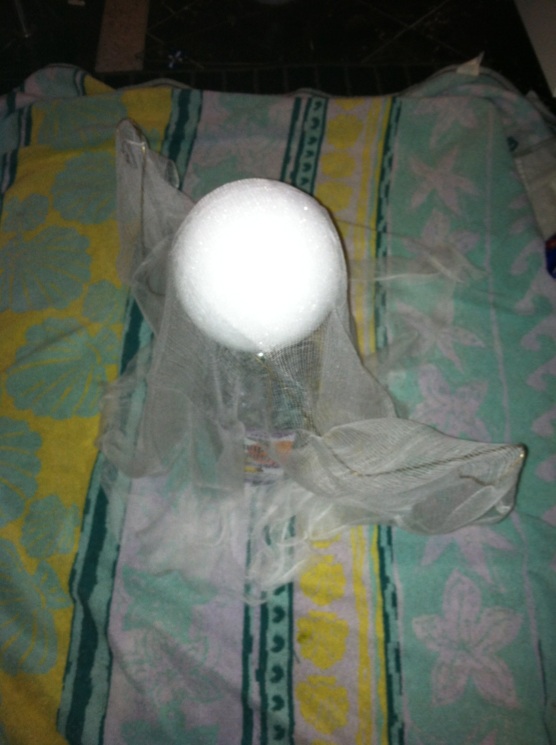
Step 2: Find a place to dry your ghost, lay out your towel, and then drape your cheesecloth over the form. I bought a large section of cheesecloth and trimmed it to fit over the form.
Step 3: Spray the cheesecloth thoroughly with starch, and let dry. I tried speeding up the process with a blowdryer, but it blew the arms and made the first figure look strange, I preferred just letting it dry over time. On top of the oven was best-while we were baking it kept it warm and dry.
Step 3: Spray the cheesecloth thoroughly with starch, and let dry. I tried speeding up the process with a blowdryer, but it blew the arms and made the first figure look strange, I preferred just letting it dry over time. On top of the oven was best-while we were baking it kept it warm and dry.
Step 4: Add a face with felt or stickers or whatever if you want. I liked how it looked just with the cheese cloth, but later on we added a sticker face. Then display it and enjoy!

Project # 2
Shrunken Heads! These were soooo much fun! Look at that guy!
Shrunken Heads! These were soooo much fun! Look at that guy!

Isn't he just creepy!? I love the "hair" and this was something our lil guy helped with.

Even the Wolf could help!
Okay...so I found this one on Pinterest and it was before the secret boards came out, so I didn't mark the pin that I used. If you want it I can get it, but um, well. Yeah, I doubt anyone asks for it!
Okay...so I found this one on Pinterest and it was before the secret boards came out, so I didn't mark the pin that I used. If you want it I can get it, but um, well. Yeah, I doubt anyone asks for it!
All you need are apples, a cutting board, cutting tools, an oven some water and lemon juice!
Step 1: Peel the apples. Doesn't matter what kind. I just bought the cheapest there. Bigger apples make bigger heads, and different kinds make different color heads in the end. For the first one we just used the same kind of apples.
Step 2: After peeling apples soak them in water with a little bit of lemon juice. A tablespoon or two will suffice.
Step 2: After peeling apples soak them in water with a little bit of lemon juice. A tablespoon or two will suffice.
Step 3: After soaking the apples a bit-the lemon juice method helps to keep them from browning- carve them into faces.

As you can see- they don't need too much detail... and if you are wondering where the scraps are- well. It was apple, after all. I ate every last piece that I carved away. ^_^
Step 4: Turn your oven on to no higher than 175 F. Put the apples on a wire rack, and stick them in the oven. After about ten minutes turn the oven off and let the apples sit over night.
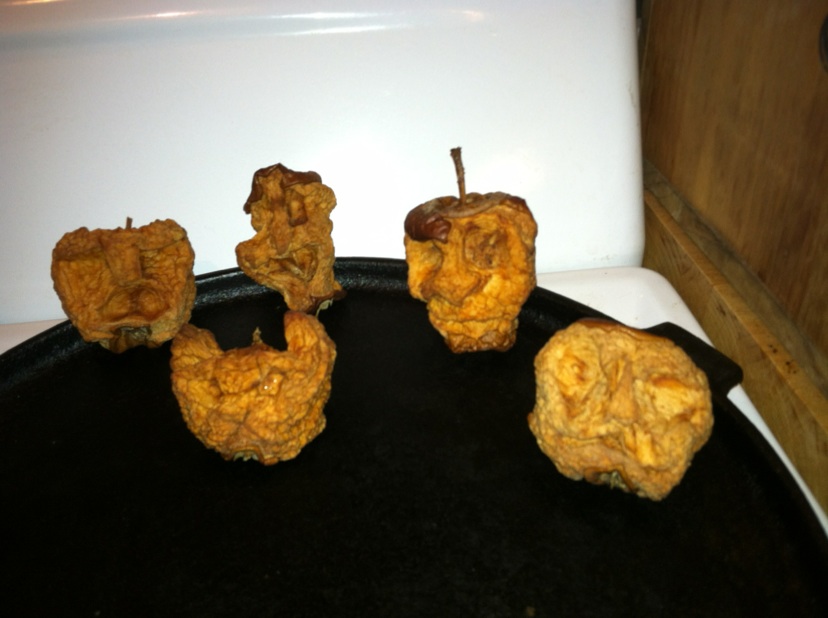
The next morning they should look something like this

Don't worry if they aren't completely dry. The process really depends on the moisture levels and slowly drying them out. If you need to put the oven up to 175 again for a little while and let them dry some more. Just make sure they are not squishy when you pack them up for next year! ~I actually will dry ours a bit more before packing in plastic baggies for the attic. I'm interested to see what they'll look like after ebing in the attic for a year!

He was my favorite. I loved the tuft of hair on his face and his nose. So cool!
Oh, and a great way to add some life is by placing cloves for their eyes after they've dried and rice for the teeth...my hubby liked this look better than the rice and cloves...maybe next time!

Here's how I displayed the creepy shrunken heads. I made some Monster Munch for Halloween (careful, that stuff is addicting!) And I had a burlap sack from some pistachios we bought in New Mexico so I put some tissue in the bag, poked some toothpicks in the heads and arranged them in the sack. Easy schmeezy!
Project # 3
Head in a jar! Oh this was super cool! It was a bit harder finding a head big enough for what we wanted and malleable enough to fit in the jar I had...but we did it!

Some other stuff was included in our Ghoulish festivities, and if I get some time I will post some of those recipes. But for now, I need to go pump out some words for my Nanowrimo book.
Thanks for reading, and let me know what you've been up to! I'd love to see some other bloggers and their projects!
Hi, I'm your newest follower from the Aloha Affair blog hop, would love for you to come by and follow back, and join my weekend blog hop?
ReplyDeleteErica
http://www.ericastartwalking.com/2012/11/im-blogger-girl-in-blogger-world-blog_16.html
Hey Erica! Thanks for following!
DeleteI am sorry I missed your weekend hop, but let me know about the next one, I'd love to blog hop with you!
I hope your Thanksgiving was great, and look forward to checking out your blog!
so darn cool.
ReplyDeleteAloha Sweet Friend,
The ladies and I are starting to gather a bit early this week so that we can take our turkey loving time mingling and growing together over the next few days.
Thank you for linking up with us last week, thank you for sharing your sweet energy with all of us... thank you for being beautiful you.
Come join us if you please.
xo,
Nicole
localsugarhawaii.com
DeleteAloha to you, too!
Thank you so much for the invite, and for stopping by my blog! I hope you enjoy yourself here for a while!
Oh, and I'm happy to share a story and a smile, anytime!
Hope your Holidays are wonderfully filled with love and light!
Bussi,
Cassie